Installing the AdRiver JS-Counter tracking code using Google Tag Manager
- From here on, we will use the abbreviation «GTM» instead of «Google Tag Manager».
- This guide will sequentially describe the steps that need to be taken to integrate AdRiver codes into GTM. This guide is not a complete implementation, but rather a demonstration. All the variables, triggers, rules, and tags mentioned in this guide are also examples only.
1. Global site Tag (all_site)
The global site tag is required for correct conversion tracking and must be deployed on every page of your site.
Tag trigger setup
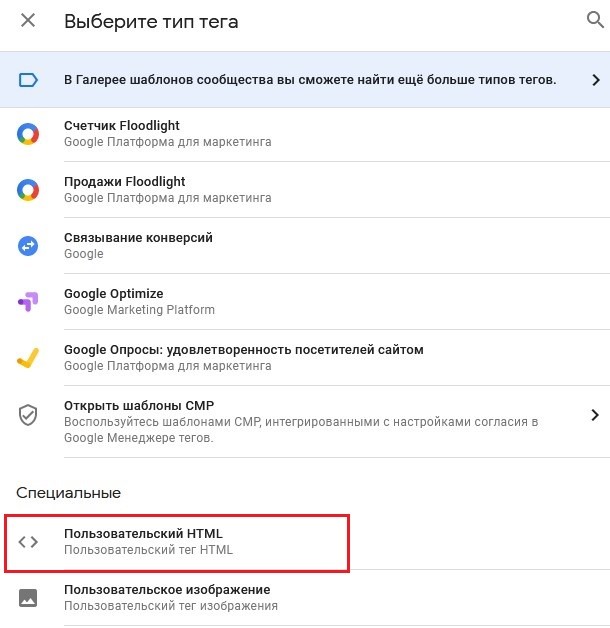
Navigate to the «Tags» menu and click «Create». In the «Tag Configuration» field select the «Custom HTML» tag type.
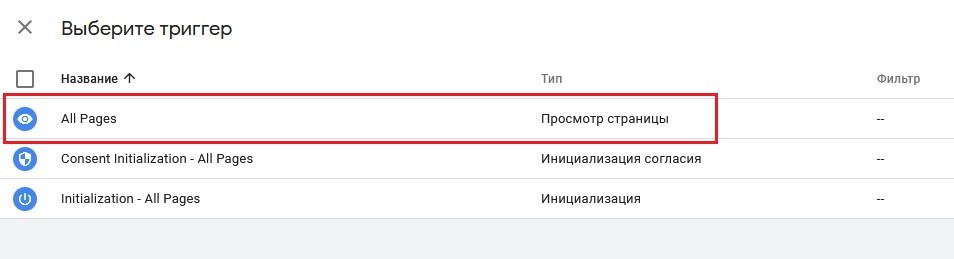
Copy the contents of the img_all_site.txt file and paste it into the HTML text field. Select «All Pages» trigger.
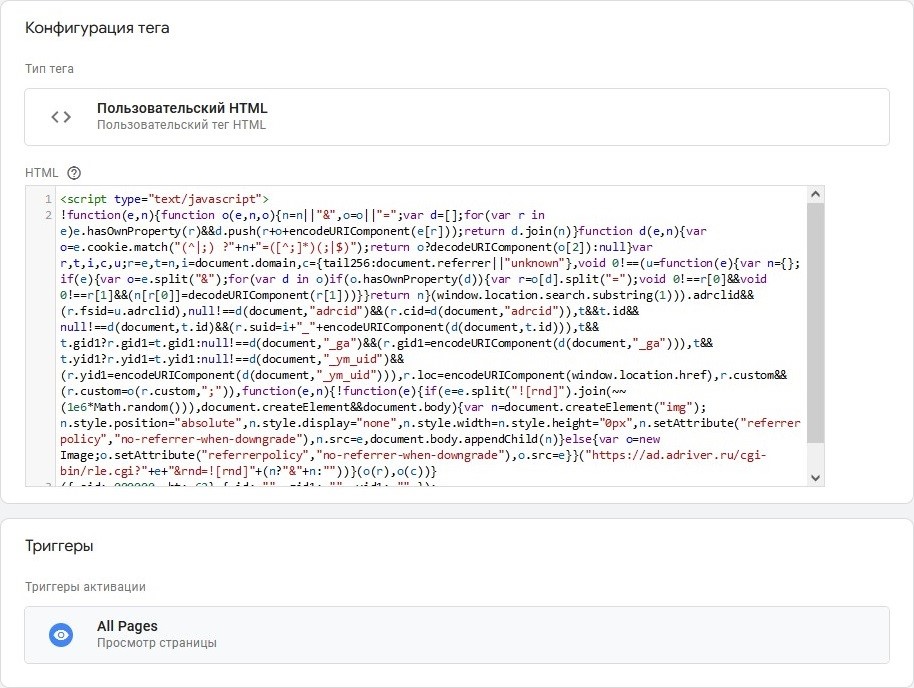
It should turn out similar to this:
You can provide an arbitrary tag name for your convenience and click «Save» to confirm. Then click «Submit» to complete the setup process and «Publish» to apply changes to your site.
As a result, AdRiver tag is activated on every visit to the site and you can check it out in the console:

2. Code for product cards (product)
The product card code allows the system to collect information about the viewed products.
This code must be called during a «quick view» of products (if such functionality is available on the site) and on product pages (product cards).
The code should transmit information about the viewed products, namely product id.
Code setup
For the GTM product code to work correctly, we need to set up a tag, a trigger to activate the tag, and a variable to pass information about the product being viewed to the tag.
2.1 Setting up the variable to pass offer_id
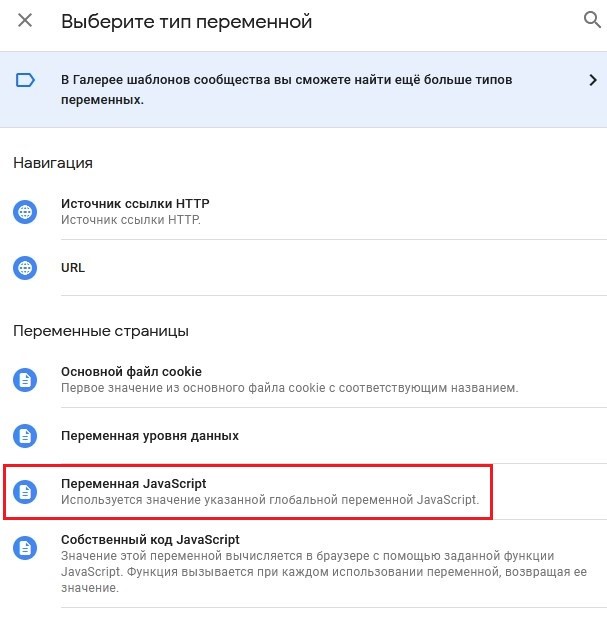
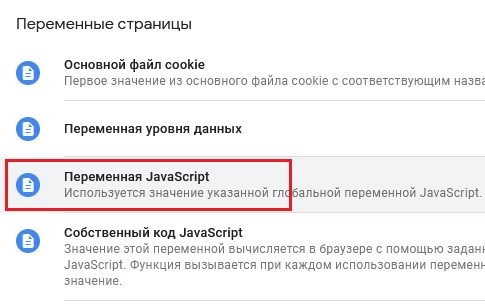
In our example, the site uses the transfer of the product id through JavaScript. In GTM, you can get these values through the «JavaScript Variable»:
The javascript code on our website that contains information about the product:

In this case, we are interested in the offerid, to which the value M03EWAhM1 is passed.
In the configuration of the GTM variable, specify the name of the variable that is used on the site to transfer the product id:
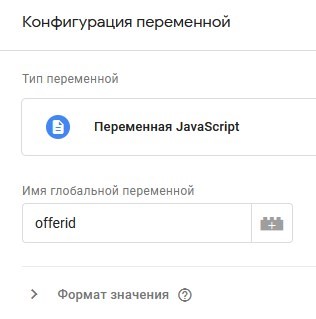
Attention! GTM is case sensitive, offerid does not equal offerID.
The name of the variable can be chosen arbitrarily, for the convenience of its further use it can be called «offerid». Click «Save» and this completes the variable setup.
2.2 Trigger setup
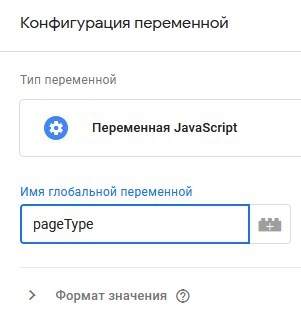
We need the product code to work only on product cards. As an example, this can be done with a trigger «viewing some pages». To do this, we need a variable into which we will pass the type of the page being viewed.
The type of page viewed on our site is determined by passing the value to the variable pageType. If the value is equal to productPage, then we are on the product page.

We need to set up the trigger so that it only activates if pageType gets to productPage value.
For this, in GTM we will create a JavaScript variable that will receive a value from pageType:
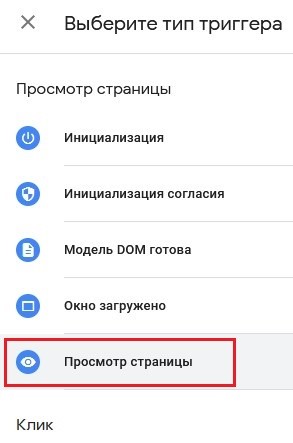
Now let’s create a page view trigger:
In the trigger activation conditions, select «Some page views», and as events, select our pageType variable from the list, equals, and enter the value that the variable should take on the product cards (in our case, productPage):
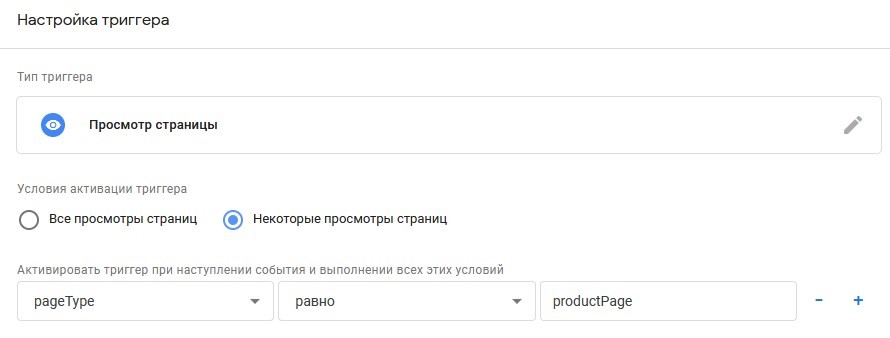
In the name of the trigger, specify «Product card», and click «Save». Now we can proceed to configuring the tag.
2.3 Tag setup
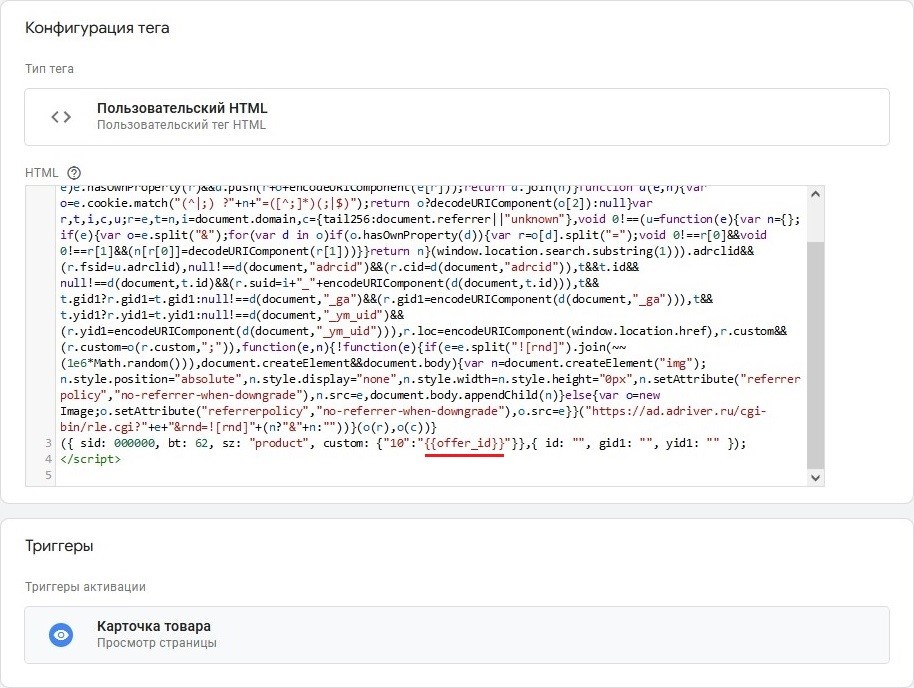
Create a tag with the «Custom HTML» type, insert the contents of the product.txt file into the tag configuration field, use the «Product Card» trigger, which we configured in section 2.2, as a trigger.
To pass the product id to our code, we replace the offer_id in quotes with the variable that we set up in paragraph 2.1 (in our case, the variable is called offerid). GTM uses double curly braces to pass variables inside tags: {{variable_name}}
It should turn out similar to this:
Save the tag, publish the changes in GTM, and when visiting the product cards on our website, we will see the call to the product code in the console along with the global site code:

3. Code for adding goods to the cart (add_basket)
Installing a code for adding goods to the cart will allow the system to track users who were close to checkout on your site, but left the site without completing the purchase.
This code can be set in one of the two ways:
- on the «Add to Cart» buttons (the preferred option, because these actions are more common)
- to the user’s shopping cart page
The code should pass information about the product in the cart, namely the product ID.
Code setup
For the GTM add_basket code to work correctly, we need to set up a tag, a trigger for activating the tag, and a variable for passing information about the goods that are being added to the cart to the tag. We already have a variable that receives the product id, we set it up in clause 2.1 (the offerid variable), so we can use this variable both for the product code and for the cart codes: add_basket and del_basket.
3.1 Trigger setup
To add goods to the cart, we use the «Add to Cart» buttons, so let’s set up the trigger so that it works when these buttons are clicked.
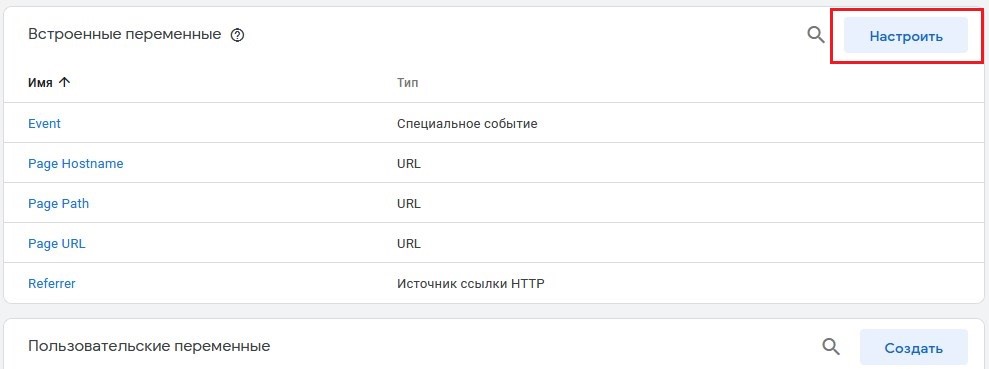
For this, we need a built-in variable, which is disabled by default in GTM. To enable it, on the «Variables» tab, click the «Configure» button:
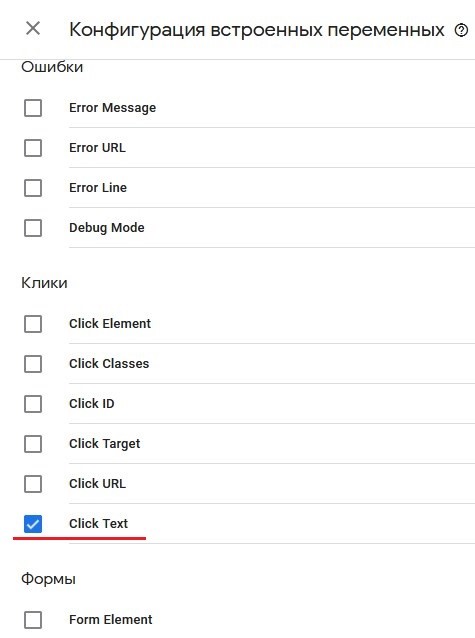
In the drop-down menu on the right, choose the Click Text variable:
Now we can move on to setting up the trigger itself.
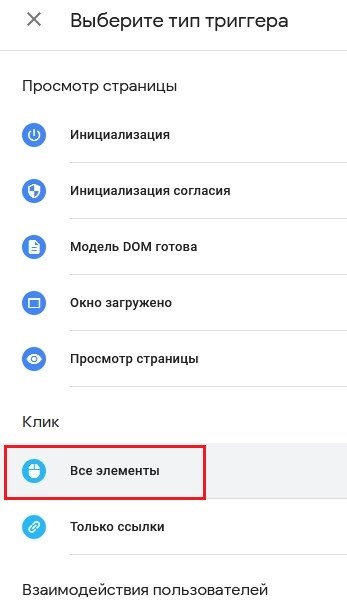
Let’s create a trigger with the Click type — All elements:
In the trigger settings, specify «Some clicks» in the activation conditions, select the Click Text variable as events, equals, and enter the text of the button, which should activate the trigger when clicked, in our case, «Add to cart»:

Save it and as the name of the trigger, we can specify «Click — add to cart».
3.2 Tag setup
Create a tag with the «Custom HTML» type, insert the contents of the add_basket.txt file into the tag configuration field, use the «Click — Add to Cart» trigger that we configured in clause 3.1 as a trigger.
To pass the product id to our code, we replace the offer_id in quotes with the variable that we set up in clause 2.1 (in our case, the variable is called offerid). GTM uses double curly braces to pass variables inside tags: {{variable_name}}
It should turn out similar to this:

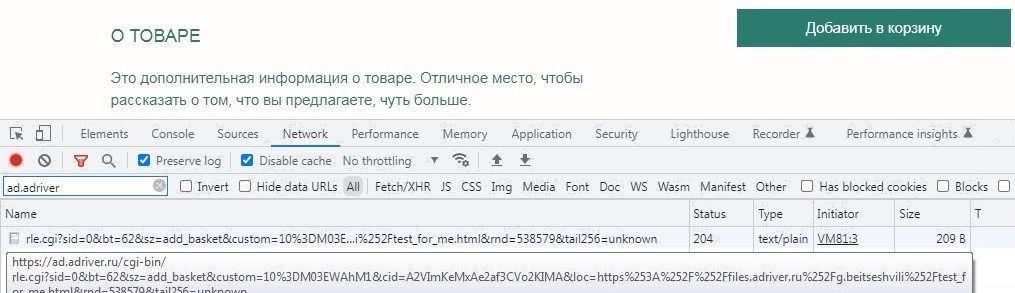
Save the tag with an arbitrary name, publish the changes in GTM and when clicking on the buttons «Add to cart» on our website we will see the call to the add_basket code in the console:
4. Code for removing goods from the basket (del_basket)
Code setup
For the del_basket code to work correctly in GTM, we need to set up a tag, a trigger for activating the tag, and a variable for passing information about the product being removed from the cart to the tag. We already have a variable that receives the product id, we set it up in clause 2.1 (the offerid variable), so we can use this variable both for the product code and for the cart codes: add_basket and del_basket.
4.1 Trigger setup
To remove goods from the cart, we use the «Delete» button. Let’s set up the trigger so that it works when these buttons are clicked.
For this, we need a built-in variable, which is disabled by default in GTM. How to enable it, we described in clause 3.1.
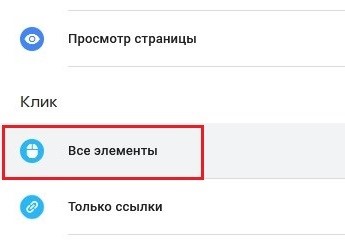
Let’s create a trigger with the Click type — All elements:
In the trigger settings, specify «Some clicks» in the activation conditions, select the Click Text variable as events, equals, and enter the text of the button, which should activate the trigger when clicked, in our case, «Delete»:

Save and as the name of the trigger, we can use «Click — delete».
4.2 Tag setup
To create a tag with the «Custom HTML» type, insert the contents of the del_basket.txt file into the tag’s configuration field, and use the «Click — Delete» trigger that we configured in clause 4.1 as a trigger.
To pass the product id to our code, we replace the offer_id in quotes with the variable that we set up in clause 2.1 (in our case, the variable is called offerid). GTM uses double curly braces to pass variables inside tags: {{variable_name}}
It should turn out similar to this:

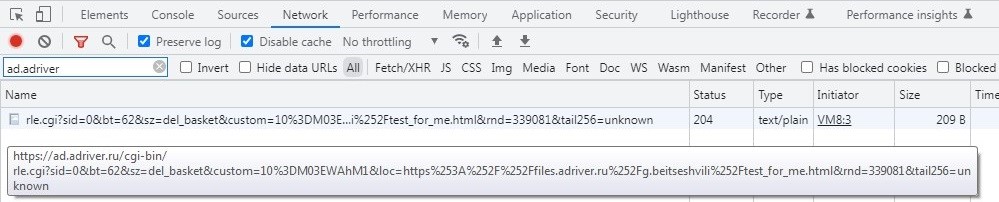
Save the tag with an arbitrary name, publish the changes in GTM and when clicking on the «Delete» button on our site we will see the activation of the del_basket code in the console:
5. Order confirmation code (order)
Upon successful completion of the checkout on your site, the user is redirected to the order confirmation page, which displays the order number and brief information about it. By embedding a code on this page, the system can keep track of which products users purchase.
If the site has the ability to place a «quick order» («order in 1 click»), this code should also work with this action.
The order confirmation code should transmit information about the order number, and preferably its amount and the id of the ordered goods.
Code setup
For the order code in GTM to work correctly, we need to set up a tag, a trigger for activating the tag, and variables for passing order information to the tag.
5.1 Variables setup
When placing an order on the site, information about the order is generated in the form of JavaScript variables:
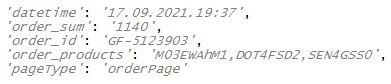
We need to report this information to GTM. To do this, let’s create 3 JavaScript variables in the GTM interface:
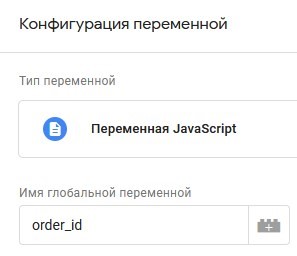
In each variable, we indicate the parameters we are interested in: order_id, order_sum and order_products:
You should get 3 variables:

This completes the setup of variables, we can move on to setting up the trigger.
5.2 Trigger setup
In our case, we want to activate the order code when clicking on the «Checkout» button, so let’s set up the trigger so that it activates when this button is clicked.
For this, we need a built-in variable, which is disabled by default in GTM. How to enable it, we described in clause 3.1.
Let’s create a trigger with the Click type — All elements:

In the trigger settings, specify «Some clicks» in the activation conditions, select the Click Text variable as events, equals, and enter the text of the button, which should activate the trigger when clicked, in our case, «Checkout»:

Save and as the name of the trigger, we can specify «Click — checkout».
5.3 Tag setup
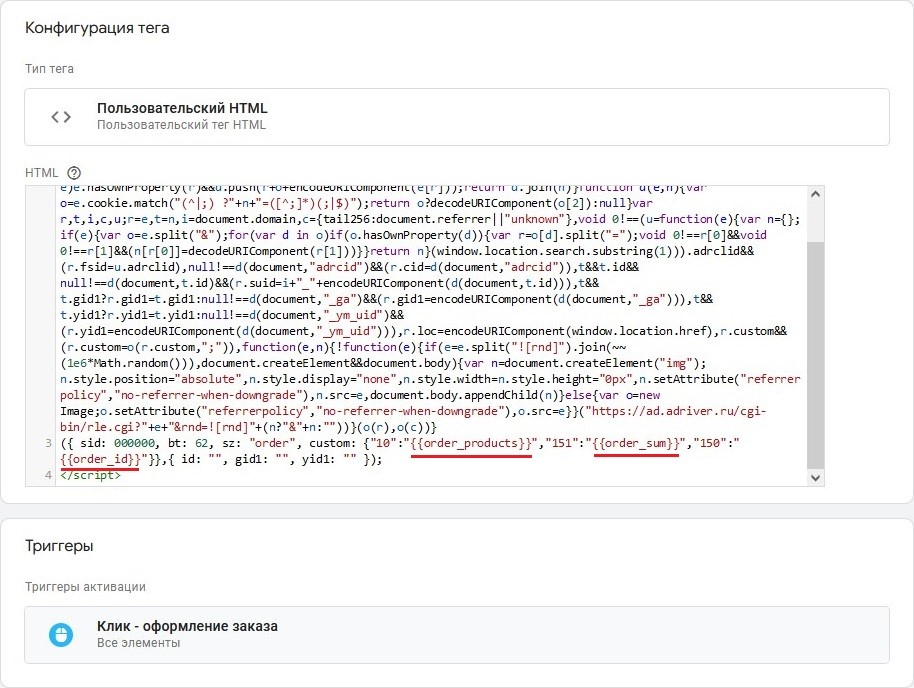
Start by creating a tag with the «Custom HTML» type, insert the contents of the order.txt file into the tag’s configuration field, use the «Click — checkout» trigger, which we set up in clause 5.2, as a trigger.
To pass information about the order to our code, we will need to replace the text in quotes with the variables that we set up in clause 5.1. GTM uses double curly braces to pass variables inside tags: {{variable_name}}
Replace «lead_id» with «{{order_id}}»
Replace «order_sum» with «{{order_sum}}»
Replace «offer_id» with «{{order_products}}»
It should turn out similar to this:
Save the tag with an arbitrary name, publish the changes in GTM and when the «Checkout» button is clicked on our website we will see the order code activate in the console:

If we decode the activated code, we will see that the correct values are passed to the customs:
sid=0&bt=62&sz=order&custom=10=M03EWAhM1,DOT4FSD2,SEN4GSS0;150=GF-5123903;151=1140
Alternative parameter passing through data layer (dataLayer)
Sometimes the data that we want to use when activating tags can only be loaded after the user interacts with the page (for example, generating an order id dynamically).
In this case, the data layer will help us transfer information into GTM (more details can be found here: https://developers.google.com/tag-manager/devguide)
To set up the data layer, add the following code snippet at the beginning of the page before the installed GTM container:
<script>
    dataLayer = [];
</script>
The code snippet above is an empty object that can be filled with information to be passed to Google Tag Manager.
You can fill the data layer by calling push(), which adds variables to the data layer and replaces them. The simplest syntax for setting dynamic data layer variables is as follows:
dataLayer.push({'variable_name': 'variable_value'});Here variable_name is the name of the data layer variable to be configured, and variable_value is the value of the variable to be set up or replaced.
Let’s say that we need to transfer information about a newly generated order to the GTM data layer (and later to our code). You can do this by activating the following code on the site:
dataLayer.push ({
  		'order_sum': '1140',
		'order_id': 'GF-5123903',
		'order_products': 'M03EWAhM1,DOT4FSD2,SEN4GSS0',
});
To receive this information in GTM, you will need to use a data layer variable:

In the configuration, we indicate the name of the variable that we pass from the site to the data layer and which value we are interested in. Leave the data layer version unchanged.
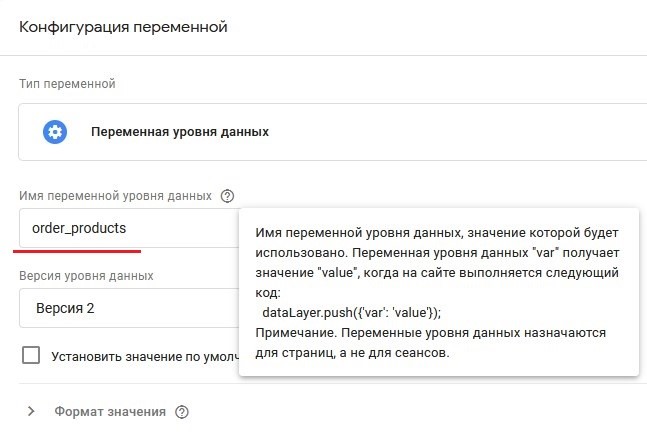
Let’s name this variable «order_products» and save it.
Now, when we activate this variable in GTM, it will return its value to us, in our case, this is a list of goods issued at the time of order: M03EWAhM1,DOT4FSD2,SEN4GSS0
Like all variables in GTM, data layer variables are activated with double curly braces: {{variable_name}}
An example of a tag configuration in GTM for the order code with variable activation:

In the browser console with this tag configuration, we will see the following code activate with the parameters transmitted:

Checking the correctness of a tag and trigger settings (Tag Assistant)
In GTM, you can check the correctness of a configured tag after each change.
To do this, click on the «Preview» button:
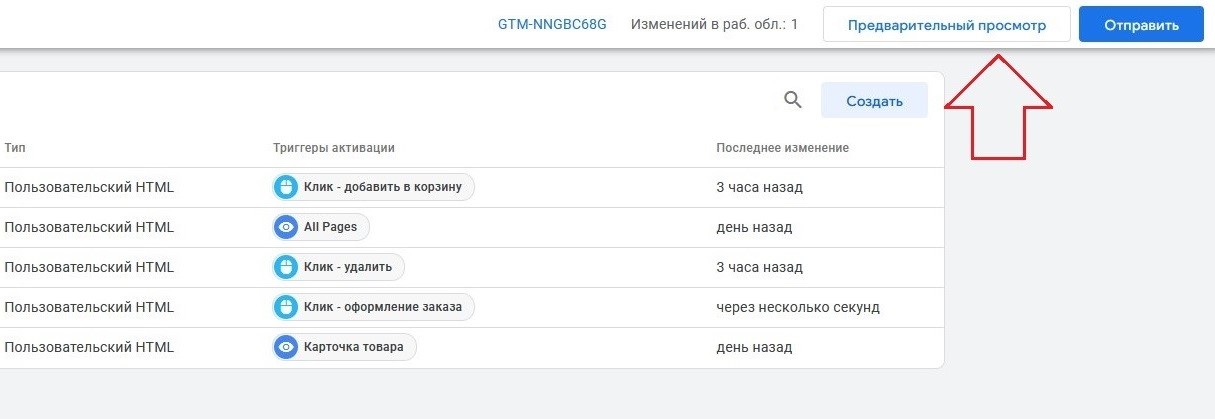
In the suggested window, enter the URL of the page where you would like to check the configured tags, and click «Connect»:

Information about the available tags for the page can be found on the Tag Assistant page:
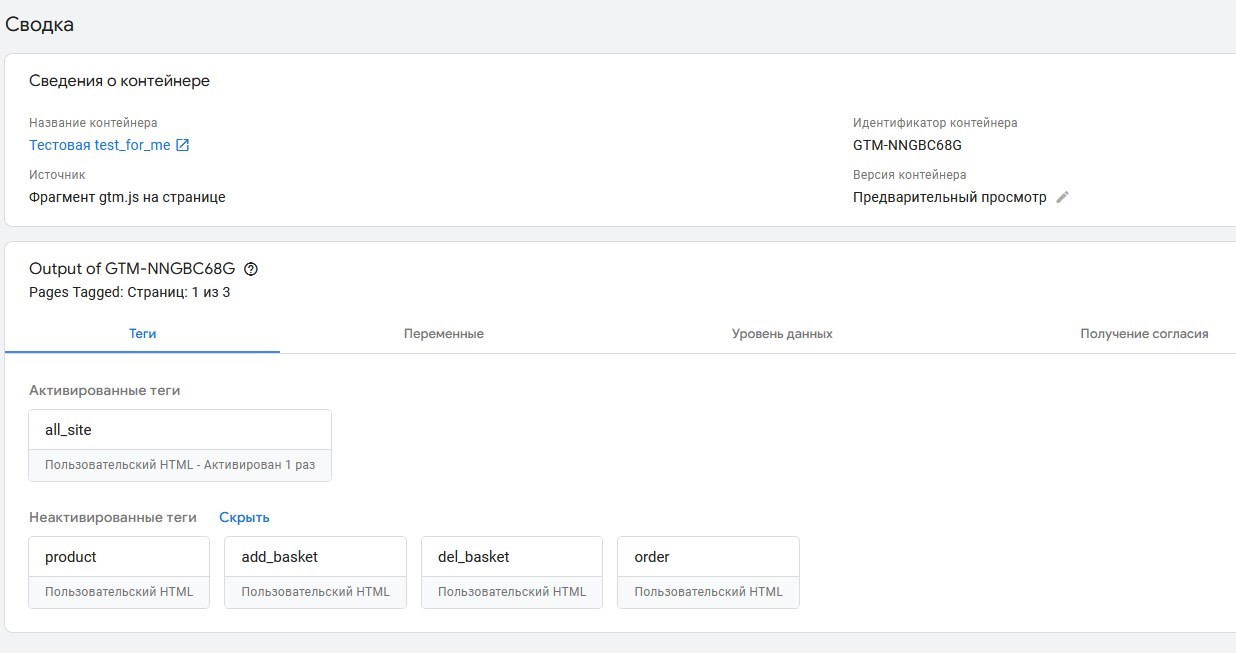
It will also show you which tags were activated and which were not, so you can check if the tag is activated when triggers are set up.
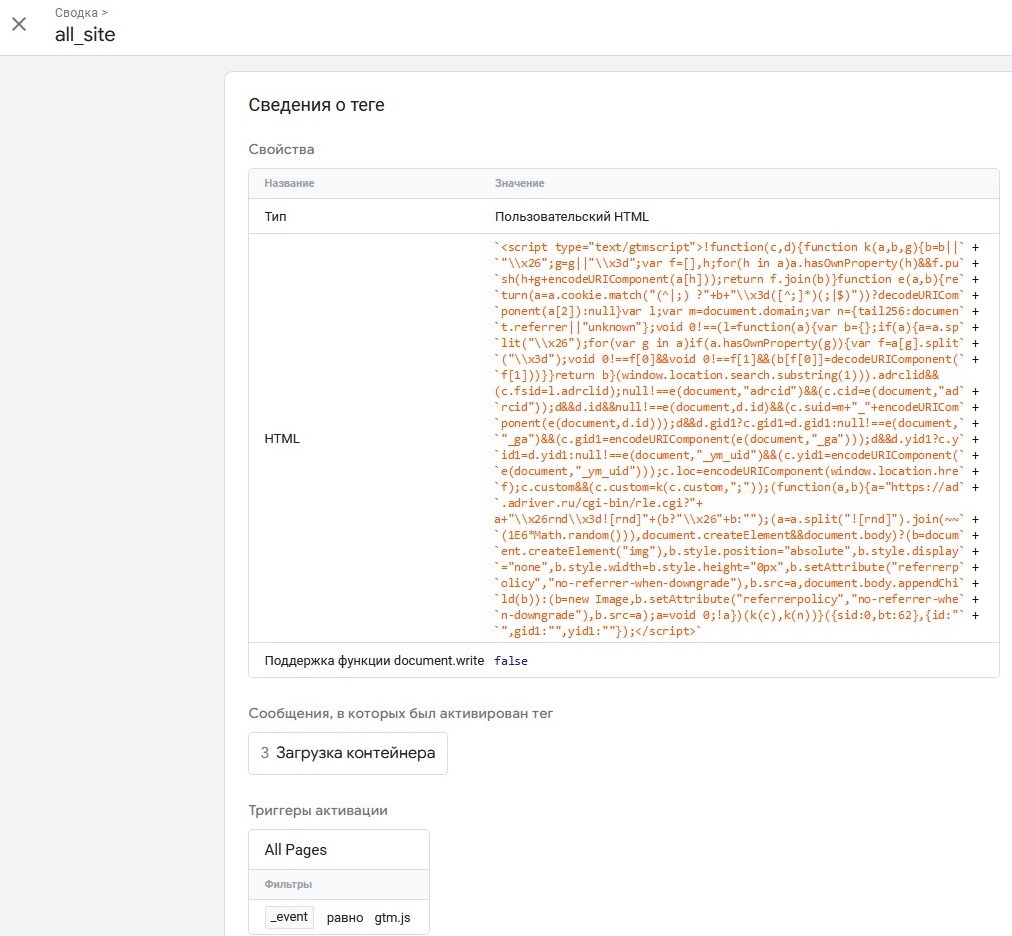
By clicking on the tag, you can see under what conditions it is activated and what code it runs.
After setting up all the tags in GTM, the changes need to be published to apply them to the site for all users. To do so, click on the «Publish» button and confirm the action.